Simple L2 Switching
This is a brief walk-through of a basic VTS request that will create a topology with several hosts and a DHCP server. This topology will serve as the foundation for several other tutorials that you may also execute, walking you through basic VTS workflows as well as a simple illustration of the power of full control of isolated network topologies.
This tutorial may be executed using the geni-lib suite (see here
for installation instructions), either the genish command line tool, or the identically named ipython extension.
For both tools you will need to download your omni.bundle file from the GENI Portal. You can find
instructions for doing so in the geni-lib docs.
You can also use VTS with a Cloudlab account (without an omni.bundle), and you
can find documentation for acquiring these credentials in the geni-lib docs.
If using Cloudlab credentials with geni-lib, please review the geni-lib documentation for using these
credentials.
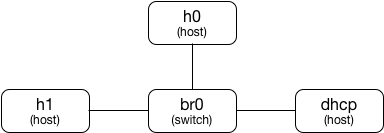
Topology
Build the Request Object
In order to request this topology, we can create a resource request object for VTS using genish (at the command line or in
ipython notebooks):
r = VTS.Request()
We then add our switch:
br = r.Datapath(VTS.OVSL2Image(), "br0")
There are a limited number of switch images available in GENI - the two most commonly used are the one above, which is a normal MAC-learning
bridge with VLAN support, and an Openflow-supporting image (referenced in geni-lib as VTS.OVSOpenFlowImage, with some required
configuration parameters). The second argument to Datapath is the client_id of the bridge, which you will need to know later in order to
query it for monitoring and state information. We assign the return from r.Datapath(...) to a variable that we will use later in the
request to build links.
Now we add our hosts:
h0 = r.Container(VTS.Image("uh.net-client"), "h0")
h1 = r.Container(VTS.Image("uh.net-client"), "h1")
dhcp = r.Container(VTS.Image("uh.simple-dhcpd"), "dhcp")
Switch images are added using the Datapath constructor, while hosts are added using the Container constructor. As with datapaths there
are two arguments - the image object to be used, and the client_id of the resultant host. In the case of hosts, the client_id is also used
as the hostname, so it’s preferable to not choose characters that would not be valid in a hostname.
In this case we use two images that are available at all GENI VTS sites - the “uh.net-client” image, which is a basic linux host with
networking tools installed (tcpdump, scapy, iperf, etc.), and the “uh.simple-dhcpd” image, which is a trivial DHCP server that supports a
single IPv4 subnet. By default the subnet used for DHCP is 192.168.50.0/24, but you can change that value by setting the image
attribute subnet if you desire:
dhcp.image.setImageAttribute("subnet", "10.70.10.0/23")
Now we need to add links between our nodes:
VTS.connectInternalCircuit(br, h0)
VTS.connectInternalCircuit(br, h1)
VTS.connectInternalCircuit(br, dhcp)
Now our request is complete, and we can send it to the aggregate manager at a site to reserve our resources.
Make the Reservation
Choose a site, and store it in a short-to-type variable name for later:
SITE = VTSAM.StarLight
You may also want to store your slice name in a short variable name for ease of use or changing later:
SLICE = "my-slice-name"
Of course, change that value to the name of a slice that you control.
Now create the sliver for our resource request, and get the manifest back:
manifest = SITE.createsliver(context, SLICE, r)
If there is an exception, note the problem and either resolve it yourself (if you need to delete an existing sliver, etc.), or
send email to geni-users@googlegroups.com to see if someone can help you. Otherwise, proceed with the rest of the tutorial
using the manifest that was returned above.
Visualize Reserved Resources
If you are using the genish ipython notebook extension, you can get a visual topology diagram using the built-in manifest
renderer:
genish.showtopo(manifest)
If you are using the command line genish shell, you can get dot output,
which you can use in graphviz or any other dot supporting tool:
util.builddot([manifest])
Note
util.builddot takes a list of manifests, so if you only have one manifest you still need to put it into a list.
Connect to Topology Hosts
Now that the hosts in this topology have been provisioned, you can get login information in order to configure SSH to access your hosts:
genish.printlogininfo(manifest)
If you are using the genish shell, you can access a similar method in the util module:
util.printlogininfo(manifest=manifest)
Note
The core util.printlogininfo function takes a number of arguments that can be used to get a manifest that you
do not already have. Given that you already have a manifest, you can pass it in directly using the manifest
argument.
The output comes in 4 pieces - the client_id you requested in your reservation, the username you should use to access this resource, the internet-accessible hostname or IP you can use to reach the resource, and the port number to be used for SSH. It will come in a table in ipython, or in a simple list in the command line output:
[h0][ywauusshw5k] starlight.vts.bsswks.net: 22
[h1][k10172ltax6] starlight.vts.bsswks.net: 22
In this case, if we want to connect to the container representing h0, we have the information that we can give to
an SSH client to connect:
ssh -i ~/.ssh/id_geni_ssh_rsa ywauusshw5k@starlight.vts.bsswks.net
Note
Since the default SSH port is 22, we don’t have to provide the port to the client. Also as with all GENI slivers,
the SSH public key referenced in your context object is the one used for authentication. By default it is the
one used above.
Now that you have a connection to the host, you can run dhclient to get an IP address from the DHCP server that
you provisioned in your topology:
/ # dhclient -v eth1
As we asked for verbose output, you should see something like the output below:
Internet Systems Consortium DHCP Client 4.3.4
Copyright 2004-2016 Internet Systems Consortium.
All rights reserved.
For info, please visit https://www.isc.org/software/dhcp/

Listening on LPF/eth1/f6:5e:13:3c:0f:7c
Sending on   LPF/eth1/f6:5e:13:3c:0f:7c
Sending on   Socket/fallback
DHCPDISCOVER on eth1 to 255.255.255.255 port 67 interval 3
DHCPREQUEST on eth1 to 255.255.255.255 port 67
DHCPOFFER from 10.70.10.1
DHCPACK from 10.70.10.1
bound to 10.70.10.10 -- renewal in 375 seconds.
Now that you have established that your topology is working, you can walk through the below sections to view internal network state.
View DHCP Lease State
Many images offer a number of POA (Perform Operational Action) APIs that can be used to gather data about
the current image state. In the case of the uh.simple-dhcpd image we can gather information about the leases that the
DHCP server has currently allocated:
SITE.getLeaseInfo(context, SLICE, "dhcp")
This will give you a table with the current lease state - allocated IP addresses, MAC addresses, when they expire, and
(depending on information offered by the host) the hostname of the requesting host. As long as dhclient continues
to run on each host the client process will renew the leases as necessary.
View Switch MAC Table
Similar to the information offered by the uh.simple-dhcpd image, we can inspect the switch state to view learned
MAC addresses:
SITE.dumpMACs(context, SLICE, "br")
This will give you table with the current MAC table state on the switch (you can also pass it a list of switches, if your topology has more than one switch). This will include the port number the MAC is learned on, the VLAN if appropriate, the MAC itself, and the current age. The default aging time for the OVSL2Image is 300 seconds, so a MAC not seen for 5 minutes will expire from the table.